Tuesday, November 30, 2010
*Our professional wedding pictures*
Here are some more pictures from our wedding, October 2. These are from our professional photographer...I think they're amazing!
Sunday, November 28, 2010
Recipe Link up
Head on over to Remodelaholic to link up your favorite recipes! I shared my deep fried pickles! They are so, so yummy...even if they are a "tad" fattening! =] Try 'em out!
Friday, November 26, 2010
My dream came true!
So, I posted a blog several months ago rambling about how I really wanted a Cricut and blah blah blah....well....I GOT ONE!! Menards was having a Black Friday sale, $148 for the Cricut Expression, which is $100 off! And, they had the cartridges for $19.99! I am sooo excited! Anywho, I hope everyone had a splendid Thanksgiving and if you braved the masses to go out this morning, I hope everything went well! My husband and I's toes were frozen solid, we couldn't feel them at all. =]
Thursday, November 25, 2010
Happy Thanksgivin'!
I hope everyone has a marvelous Thanksgiving! I can't wait to sink my teeth into some yummy food. This year, I actually get to go out for Black Friday! I'm kinda torn about it though, it's supposed to be a HIGH of 29 all day, so it's going to be -56 at the time we have to go! eeeek! I'm not looking forward to frost bite! But anyways...have an awesome and yummy day!
Wednesday, November 24, 2010
Wedding pictures
I just thought that I would post some pictures from my wedding from last month. I had made a couple of posts about the things I had made for it. So, here was the big day. It was raining all morning. It eventually stopped, but was overcast all day. That's alright, those are the best days to take pictures! I had the best day ever, everything was exactly how we wanted it!
BRIDEZILLA!!!
Our cake...I made the candle holders...from the Dollar Tree! And I made the topper!
My hair...
BRIDEZILLA!!!
My bouquet. I looooved this.
Our cake...I made the candle holders...from the Dollar Tree! And I made the topper!
My hair...
Monday, November 22, 2010
Dollar Tree wreath
I have a few wreath forms and needed to do something with them. I went to the Dollar Tree, and they really have some cute things! I wanted to make a Christmas wreath, since I haven't yet. If you want to make this, here's what you need:
- 8" wreath form
- 3 strands of rope garland
- red paint
- small and large Christmas bulbs
- large snowflake ornaments
- hot glue
I wrapped the garland around. Now, this is 12' garland and it didn't even cover half of the wreath form, so I would suggest 2 or 3 strands. Also, I would paint the form red or whatever color you're going to use, because the green peeked out a little bit. I learned this after I covered the first half, so I had to go in between the holes and touch it up.
So, after I got this done...I had to rip it apart because I didn't have any more garland. I had to travel back to the Dollar Tree, which I went to another one in town, and they didn't have any of this type of garland. So, we went to the original one I got the garland at. They only had one more strand and it looked like a toddler got ahold of it, because it was all tore up. So, I had to settle with some silver and got 2 strands just to be safe, which I'm glad I did.
After I took the red off, I went ahead and painted it so that the green wouldn't show through.
Here you can see where I ripped off the red...by the way, that pink isn't my carpet! =] It's a towel.
So anyhow, I alternated the red with the silver, for every 2 silver there was a red. I think it turned out cute, kinda reminds me of a candy cane.
Then, I embellished it with some snowflake ornaments and bulbs. I didn't want to use a lot, because I thought it would be overwhelming. Here it is...not that hard, but it's been a pain! =]
Thursday, November 18, 2010
Updated end tables...finally!
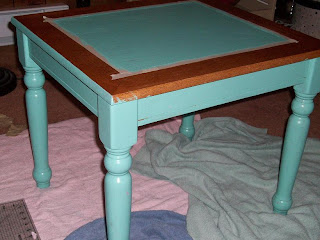
These end tables have been around for quite some time, probably 10 years. They were my mom's and when we moved back in with my mammaw, they were put into storage until it was time for me to take them. So, my *new* husband and I, we just got hitched!, have had them for about a year and a half now. I was completely fed up with the ugly ugly ugly generic finish of them and wanted to update them! I had a can of tealish paint lying around that I snagged at Lowe's for 2 bucks because it was a mistake paint! AWESOME! So, for $2, or free really since I already had everything, this is what I did.
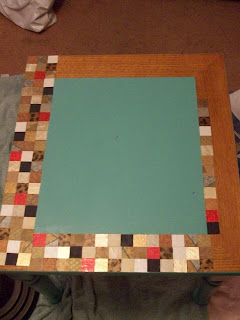
I painted the legs and trim of the table. I taped off around the center of the table and painted that so that I could do a tileing (I don't know if that's spelled right) effect. I used scrapbook paper that I already had and found complementary colors and cut them in 1inch squares. I really loved the pop of red glittery paper.
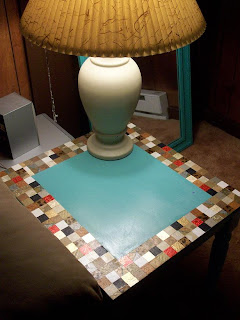
I Mod Podged all the paper on it in random patterns. These pictures really don't do it justice. It's much more bright and shimmery in the light than what this shows.
Here it is finished! I looove it. Now, all I need to do now is update the lampshade, which was my mom's and is completely broken and hanging on for dear life. And, update the lamp itself! Any ideas?!?!?
Subscribe to:
Posts (Atom)